Sauna ventilation: where the vents go and how much air the room needs
Fresh air is the part of a sauna build that gets skipped most often. Here is how the vents are laid out for electric heaters and wood stoves, what size they should be, and how to work out the airflow for your own room.
Short answer
Yes, every sauna needs ventilation. The usual target is about six full air changes per hour. With an electric heater and natural (gravity) airflow, fresh air comes in low beside or under the heater through a 50 to 100 mm (2 to 4 in) vent, and stale air leaves near the floor on the far side of the room through an exhaust about twice that size. A wood stove pulls its own combustion air, so the inlet goes near the floor close to the stove and the outlet goes high on the opposite wall.
Why a sauna needs ventilation at all
A sealed hot room fills up fast with what the bathers breathe out. The air gets heavy, the steam from the stones feels harsh instead of soft, and people start leaving after a few minutes without quite knowing why. The Finnish sauna industry group Sauna from Finland calls air quality the hardest part of sauna design for exactly that reason: you can't see it, so it gets left out of the plan.
Ventilation in a sauna does three separate jobs:
- brings in oxygen for the people inside, and for the fire if the stove burns wood;
- moves heat around the room so your feet aren't cold while your head cooks;
- dries the wood after the session, which is what keeps benches and walls from going grey, musty or soft.
Getting it right is mostly about where the holes are, and only then about how big they are. If you are still at the framing stage, plan the vent openings together with the rest of the outdoor sauna build, since cutting them into a finished cedar wall is much harder.
How much air a sauna needs
Heater manufacturers give the same working number in their installation manuals: the air in the room should change about six times per hour. For a small home sauna that is a gentle flow, not a draft. You should not feel it on your skin while sitting on the top bench.
| Room size (inside) | Volume | Airflow at 6 changes per hour |
|---|---|---|
| 4 x 5 ft, 7 ft ceiling (1-2 people) | 140 cu ft / 4.0 m³ | 14 CFM / 24 m³/h |
| 5 x 6 ft, 7 ft ceiling (2-3 people) | 210 cu ft / 5.9 m³ | 21 CFM / 36 m³/h |
| 6 x 7 ft, 7 ft ceiling (3-4 people) | 294 cu ft / 8.3 m³ | 29 CFM / 50 m³/h |
| 7 x 8 ft, 7.5 ft ceiling (5-6 people) | 420 cu ft / 11.9 m³ | 42 CFM / 71 m³/h |
| 8 x 10 ft, 7.5 ft ceiling (family / outdoor) | 600 cu ft / 17.0 m³ | 60 CFM / 102 m³/h |
The math is simple: room volume times six gives the hourly flow. Divide cubic feet by ten (that is, times six, then over sixty minutes) and you have CFM, the unit fan boxes in the US and Canada use.
Airflow calculator
Enter the inside dimensions of the hot room. The result is the flow for six air changes per hour.
Vent placement with an electric heater
An electric heater doesn't need combustion air, so the vents are there only for the people and for drying. There are two ways to move the air: let warm air rise and pull fresh air in on its own (gravity, or natural, ventilation), or use a small exhaust fan (mechanical ventilation). Harvia's installation guidance lays the two out like this:
| Gravity ventilation | Mechanical ventilation | |
|---|---|---|
| Fresh air in (supply) | Below or beside the heater | High in the room, above the heater |
| Supply size | 50-100 mm (about 2-4 in) across | Sized to the fan and duct |
| Stale air out (exhaust) | Near the floor, as far from the heater as you can get it, often under the benches | Near the floor, as far from the heater as possible |
| Exhaust size | About twice the supply diameter | Matched to the fan |
| Target | Roughly six air changes per hour | |
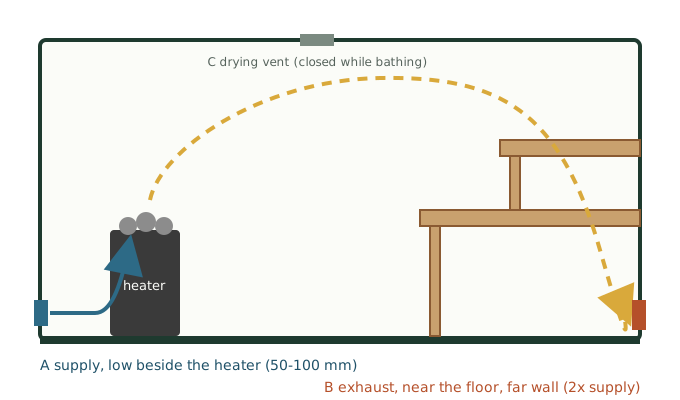
A low exhaust looks odd the first time you see it, since hot air rises. That's the point: an exhaust placed high would dump the hottest air straight outside and leave a cold layer at your feet. Pulling air out low makes it travel the whole room first.
A few details matter more than they look:
- If the heater has a separate temperature sensor on the wall or ceiling, keep the incoming air from blowing on it. Cold air across the sensor makes the heater think the room is cooler than it is.
- A drying vent high on the wall is optional. It stays closed while the heater is on and while people bathe, then opens afterward. Leaving the door open after the last round does the same job.
- If the exhaust runs through the washroom instead of straight outside, the gap under the sauna door needs to be at least 100 mm (4 in) and that washroom needs a mechanical exhaust.
Vent placement with a wood-burning stove
A wood-fired sauna changes the picture because the firebox breathes. Every log burned pulls room air through the stove and up the chimney, which already gives you a steady exhaust while the fire is going.
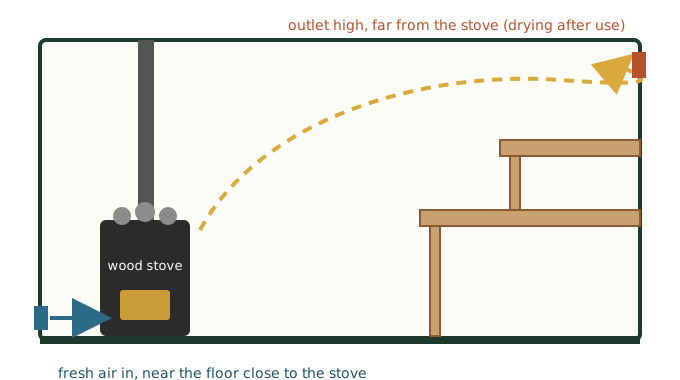
- Gravity setup: the fresh air inlet goes near the floor, close to the stove. The outlet goes near the ceiling, as far from the stove as practical, and is mainly for drying the room once bathing is over.
- Mechanical setup: the fresh air inlet sits roughly 500 mm (about 20 in) above the stove, and the outlet goes near the floor, for example under the benches.
Don't treat the chimney as the whole ventilation plan. Sauna from Finland's design advice is that a wood-burning heater helps air exchange but shouldn't be the only thing you rely on. Once the fire burns down to coals, the draw through the firebox drops too, and that is often exactly when the room is fullest.
Barrel saunas and outdoor cabins
Outdoor saunas follow the same logic, with a couple of practical twists. Barrel saunas usually come with a vent in the front or back wall; check the kit drawings and keep the inlet low near the stove and the outlet across the room. Slatted benches and the gap under the door often act as part of the airflow path in small barrels, so don't seal them shut.
For a free-standing sauna cabin, put the exterior vent covers where snow won't bury them and where the prevailing wind won't blow straight in. A simple hood or louvered cover outside and an adjustable slide inside lets you open the vents fully in summer and throttle them back on a -25°C night without blocking them completely.
Common ventilation mistakes
- No vents at all, often in a closet or basement conversion. The room reaches its sauna temperature fine and feels stuffy within minutes.
- Supply and exhaust side by side. The fresh air goes straight out again and never reaches the benches.
- Exhaust high above the top bench in an electric sauna. You lose the hottest air and get cold feet.
- A fan that is too strong. Six changes an hour is the target; a bathroom fan rated well above that turns the room into a wind tunnel and the heater can't keep up.
- Sealing everything for winter. Partly closing an adjustable vent is fine. Taping it over is how benches start to mould.
- Skipping the drying step. Open the door or the drying vent after the last round and let the room air out while it's still warm.
Questions people ask
Do saunas need ventilation?
Yes. Without fresh air the room gets stuffy fast, steam feels harsh, and the wood never dries properly between sessions. A small, well-placed pair of vents is enough for most home saunas.
How many air changes per hour does a sauna need?
Heater manufacturers such as Harvia give six air changes per hour as the working figure. For a 6 x 7 ft room with a 7 ft ceiling that is about 29 CFM, or 50 m³/h.
Where should the exhaust vent be in a sauna?
With an electric heater, near the floor on the far side of the room from the heater, often under the lower bench. With a wood stove and gravity airflow, the outlet usually goes high on the wall opposite the stove and is mostly used to dry the room after bathing.
How big should sauna vents be?
For gravity ventilation with an electric heater, the supply vent is typically 50 to 100 mm (2 to 4 in) across and the exhaust about twice the supply diameter. Mechanical systems are sized to the fan instead.
Can I use a regular bathroom fan for sauna ventilation?
Only if it is rated for the heat and installed outside the hot room with a duct, and only if its flow is close to what the room needs. Too much airflow cools the room faster than the heater can warm it.
Should sauna vents be closed in winter?
You can partly close an adjustable vent on very cold days, but don't block it completely. Close the optional drying vent while heating and bathing, then open it or the door afterward.
Sources
- Harvia, Ventilation in the sauna (support article)
- Sauna from Finland, Expert design ensures an authentic, functional sauna experience
- Government of Ontario, Carbon monoxide safety
Written by Leah, who has spent the better part of two decades heating, fixing and occasionally rebuilding a lakeside sauna and the cabin next to it.
Keep reading
Wood-fired sauna
How wood sauna stoves heat the room, stove types, chimney and clearance basics, firewood and CO safety.
Backyard sauna ideas
Placement, paths, porches, cooling spots, privacy and styles for a sauna in the backyard or at the cabin.
Sauna floor
Sauna flooring compared: concrete, tile, stone and duckboards, with drains, waterproofing and insulation.