How to build an outdoor sauna: siting, framing, benches, door and heat
A sauna is a small building with a few unusual rules: it runs hotter than any room in your house, it gets wet, and it has to dry out every time. This is the order I would plan and build one in, with the numbers that come from heater manuals rather than guesswork.
Short answer
To build an outdoor sauna, pick a level, well-drained spot, set the building on a solid level base such as a concrete pad or piers, and frame it like a small insulated shed. Inside the studs goes 50 to 100 mm (2 to 4 in) of mineral wool, then an aluminium foil vapour barrier with the shiny side facing the hot room, a 10 mm air gap and thin softwood panelling. Keep the ceiling around 2.1 to 2.3 m (about 7 to 7.5 ft), put the top bench no more than 1.2 m (47 in) below it, hang the door to open outward with no lock, and install the heater exactly to its manual.
Before you build: what a sauna has to do
Most sauna plans, from scratch or from one of the DIY sauna kits, come down to the same short list. The room has to heat up in a reasonable time, hold that heat without cooking the framing, breathe so the air stays fresh, and dry out completely between sessions. Every step below serves one of those four jobs. If you keep them in mind, the odd-looking rules (foil on the inside, a low ceiling, an exhaust vent near the floor) start to make sense.
A rough order of work for building a sauna house looks like this:
- Check permits and setbacks with your municipality or county.
- Choose the site and the room size.
- Pick the heater early, because it sets the ceiling height, clearances, wiring or chimney.
- Build the base and floor.
- Frame walls and roof, then close in the exterior.
- Rough in wiring (by a licensed electrician) or chimney and vents.
- Insulate, add the foil vapour barrier, battens and interior panelling.
- Build the benches, hang the door, install the heater and do a first burn-in.
Where to put an outdoor sauna
A good site is mostly about water and access. You want ground that drains away from the building, a short walk from the house or cabin (you will be doing it in a towel in January), and room around the walls for air and maintenance. Finnleo's installation manual for its outdoor rooms asks for at least 24 in (about 600 mm) of clearance from other structures and greenery, which is a sensible minimum even for a scratch build.
- Avoid low spots where meltwater pools in spring.
- Think about the wind: put the door on the sheltered side and keep vent covers out of the prevailing wind.
- With a wood stove, check where smoke will drift and how close the chimney is to trees and to your neighbours.
- Leave space for a small porch or changing area and a place to cool off.
Setbacks from lot lines, the house and any shoreline are set locally, so measure them before you fall in love with a spot. For layout ideas around the yard, see backyard sauna ideas.
How big to make it
Size the room around the bench, then let the heater fit the room. Harvia's design advice uses about 60 cm (24 in) of bench width per person, which gives a simple way to sketch it:
| Bathers at once | Top bench length needed | Typical inside footprint |
|---|---|---|
| 2 | 1.2 m / 4 ft | about 4 x 5 ft (1.2 x 1.5 m) |
| 3 | 1.8 m / 6 ft | about 5 x 6 ft (1.5 x 1.8 m) |
| 4 | 2.4 m / 8 ft, or an L-shaped bench | about 6 x 7 ft (1.8 x 2.1 m) |
| 5-6 | 3.0-3.6 m / 10-12 ft as an L or two tiers | about 7 x 8 ft (2.1 x 2.4 m) |
Bigger is not better past what you need. Every extra cubic foot has to be heated, and a large room with a small heater never gets good steam. Sitting is the normal posture; if someone wants to lie down, plan one bench at least as long as they are tall.
Height matters more than floor area. Harvia's heater manuals put the usual sauna height at 2100 to 2300 mm (roughly 7 to 7.5 ft). One of its North American manuals says the ceiling should be no higher than 7 ft 6 in, and gives 75 in (1900 mm) as the minimum when lowering a ceiling. Heat collects up top, so a cathedral ceiling just stores hot air above your head where it does nothing.
Foundation and floor
A sauna is heavy for its size once you add benches, a stove and stones, and it has to stay square or the door will bind. Finnleo's outdoor manual asks for a solid, flat, level surface able to carry the room at full occupancy, recommends a level concrete pad, and says to anchor the building following local code.
For a scratch build the common options are a concrete slab, concrete piers or deck blocks under a timber floor frame, or treated skids on compacted gravel for a small, movable building. Which one suits your site depends on frost depth, soil and what your building department will accept, and the reasoning is the same as for any small outbuilding; the cabin foundation guide goes through it.
The floor near the heater needs extra thought. Harvia recommends ceramic floor coverings with dark grout around and under an electric heater, since grit from the stones stains lighter materials. A wood stove generally has to stand on a non-combustible base set out in its manual. The sauna floor guide covers drains, slopes and duckboards.
Framing and the exterior shell
There is nothing exotic about the frame. Harvia's room construction table uses 2x4 (50 x 100 mm) studs at 16 in (406 mm) on centre, which is ordinary light-frame practice. Size the rough opening for the sauna door you plan to hang, not a standard house door.
Outside, treat it like any other small building: sheathing, a weather barrier, siding, and a roof with enough overhang to keep rain off the walls. Finnleo tells owners to prime and paint or stain exterior wood within a few days of installation, with a UV-resistant finish. Plan the exterior vent and chimney positions now so you aren't cutting through finished siding later.
Insulation and the foil vapour barrier
This is the layer people most often get wrong. Inside the stud cavities, the hot room side of the wall is built up like this, following Harvia's heater manuals:
| Layer (outside to inside) | What Harvia specifies | Why |
|---|---|---|
| Insulation in the stud bays | Mineral wool, 50-100 mm (2-4 in), fitted carefully; a North American manual lists R11 foil-backed fibreglass | Keeps the heat in so a smaller heater does the job |
| Vapour barrier | Aluminium paper or foil, shiny side toward the sauna, seams taped with aluminium tape | Stops steam reaching the cold framing and reflects heat back |
| Air gap | About 10 mm (3/8 in) between foil and panelling, made with battens | Lets the back of the panelling dry |
| Interior panelling | Low-mass boards 12-16 mm (1/2-5/8 in) thick | Thin wood warms fast and stays comfortable to touch |
| Wall to ceiling joint | A gap of about 3 mm | Lets the panelling move and breathe |
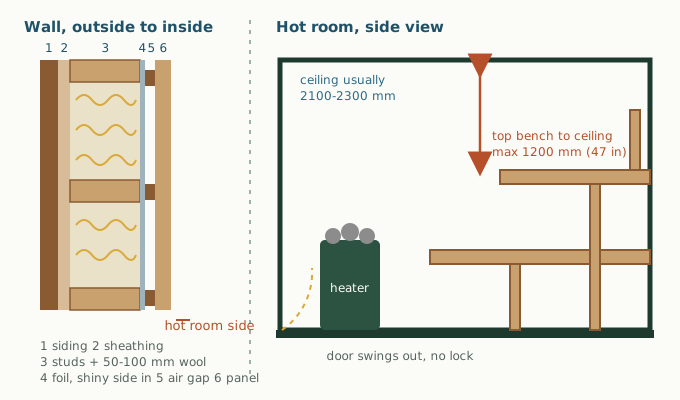
The foil has to be continuous. Harvia's design pages say the aluminium paper must be intact and leak-proof, so tape every seam and every hole you punch for wiring. The ceiling gets the same treatment as the walls, and since that is where the heat is, don't skimp on it there.
Interior wood
Inside the hot room, use softwood or a light hardwood that stays cool enough to touch. Harvia lists alder, aspen, heat-treated aspen, spruce and pine for interior panelling; in North America cedar and hemlock are common too. Pick smooth, clean boards for the benches, since that is the wood your skin sits on.
Leave the inside unfinished. Finnleo's manual says not to paint, stain or coat interior sauna surfaces, and Harvia notes that wood darkens naturally with heat, sunlight and use, which isn't a defect. For species and grades in more depth, see the guide to the best wood for a sauna.
How to build a sauna bench
Benches decide whether a sauna feels good. Heat stacks in layers, so the top bench needs to be high. Harvia's rule is that the space between the top bench and the ceiling should not exceed 1200 mm (47 in). With a ceiling at 2100 to 2300 mm, that puts the top seat at least 900 to 1100 mm (35 to 43 in) off the floor, which is why most saunas use two tiers and a step.
- Work the top bench height down from the ceiling, then split the climb into a lower bench and, if needed, a step.
- A backrest helps a lot; Finnleo's kits put the top of the backrest about 20 in above the upper bench.
- Build benches in removable sections so you can lift them out to clean and dry the floor.
- Fasten slats from underneath or recess the screws, so no metal sits where skin touches.
- Leave small gaps between slats so water drains and air moves through.
- Keep the bench away from the heater by at least the distance the heater manual gives, and fit a wooden guard rail if the manual allows or requires one.
How to build a sauna door
A sauna door is small, tight and simple, and two rules are not negotiable. Finnleo's manual says the door must open outward, and that no lock or mechanical locking device may be installed; if you want it to stay shut, use only a magnetic or spring-loaded catch. Someone who feels faint has to be able to push the door open with a shoulder.
- Use a wooden handle on both sides, since metal gets too hot.
- If the exhaust air leaves through a washroom instead of straight outside, Harvia asks for a gap of at least 100 mm (4 in) under the sauna door; otherwise follow your ventilation plan.
- Tempered glass doors are popular, but Harvia counts glass as an uninsulated surface when sizing the heater (more on that below).
Choosing and sizing the heater
The heater is the decision that drives the rest of the build, so make it before you frame. In outline:
- An electric heater needs a dedicated circuit and a cable run from the house, but no chimney. It heats predictably and can run on a timer.
- A wood stove needs a chimney, a non-combustible floor base and larger clearances, but no power. It is the traditional choice at cabins off the grid. The wood-fired sauna guide covers stoves, chimneys and safe operation.
Heater output is chosen from the volume of the room, not its floor area. Measure inside length, width and height and multiply. Harvia's manuals then add two adjustments: for every square metre of uninsulated surface such as glass, brick, concrete or tile, add 1.2 m³ to the volume, and for solid log walls, multiply the volume by 1.5. Its example is a 10 m³ room with a glass door, which should be treated like a 12 m³ room. Heater makers publish kW-to-volume tables, and some Canadian dealers have a heater sizing calculator that does the math from your room dimensions.
Check the manual for the minimum ceiling height and room volume of the model you like before you commit. These differ between models, and a heater that is too big for a small room will overheat it before the walls and benches warm through.
Clearances: follow the manual, not a rule of thumb
Every heater comes with a table of minimum distances to walls, ceiling, benches and the floor, and those numbers belong to that model only. A compact electric heater can sit fairly close to a wall, while a wood stove usually needs much more room, a non-combustible floor pad and listed heat shields. Mark the clearances on the floor and walls before you build benches, and build the room around them. If a manual and an online plan disagree, the manual wins, and your inspector or insurer will ask for it.
Ventilation in short
Plan vents while the walls are open. Harvia's figure is about six air changes per hour. With an electric heater and natural airflow, the fresh air inlet goes low beside or under the heater (50 to 100 mm, 2 to 4 in) and the exhaust goes near the floor on the far side of the room, about twice the inlet size. A wood stove draws its own combustion air, so the inlet goes low near the stove and the outlet high on the far wall for drying. The full layouts, sizes and an airflow calculator are in the sauna ventilation guide.
Electrical and lighting
Sauna wiring is a job for a licensed electrician, and in most places it needs an electrical permit and inspection. Finnleo's manual requires installation by a licensed electrician to local and national code and recommends a dedicated circuit. Harvia's manuals add a few rules for inside the hot room:
- no receptacles or plugs in the sauna room;
- light fixtures rated for sauna use, mounted about 150 mm (6 in) below the ceiling and not directly above the heater or the top bench;
- any speaker no higher than about 3 ft (914 mm) from the floor and away from the heater;
- cable runs planned before the walls are panelled, since the wiring sits in the insulated wall.
In Ontario, electrical work is inspected by the Electrical Safety Authority rather than the municipal building department, a reminder that the building permit and the electrical permit can be two separate things.
Permits and inspections
Whether you need a building permit depends on where you live and how big the sauna is, and the answer changes once you add wiring, plumbing or a wood stove. Two official examples show the range:
- The City of Ottawa requires a building permit for a residential accessory building over 10 m² (108 ft²). Only a storage shed of 15 m² (161 ft²) or less without plumbing is exempt, and a sauna isn't a storage shed.
- Coconino County, Arizona, follows the International Residential Code exemption for one-storey detached accessory structures up to 200 ft², but says that once electrical, plumbing or mechanical systems are added, the whole structure needs a building permit regardless of size.
Call or email your local building department with a simple sketch before you buy materials. Ask about permit thresholds, setbacks from lot lines, the house and any water, height limits and whether a wood-burning appliance is allowed. In Canada, insurers often ask for a WETT inspection of any wood-burning system; WETT explains what that inspection covers. Tell your insurer about the sauna either way.
First firing and break-in
Before the first real session, do the first heating the way the heater manual describes, with the room empty and the vents open. New elements, stones and wood can give off some smell the first few times. Check that the door swings freely, the vents draw, the benches feel comfortable to touch and nothing near the heater gets hotter than you expected. After each session, open the door or the drying vent and let the room dry out while it's still warm.
Questions people ask
How do you build an outdoor sauna?
Set a small timber-framed building on a level base such as a concrete pad or piers, insulate the walls and ceiling with 50 to 100 mm of mineral wool, add an aluminium foil vapour barrier with the shiny side facing the hot room, leave a 10 mm air gap and finish with thin softwood panelling. Then build two tiers of benches, hang an outward-opening door with no lock, add vents and install the heater exactly as its manual says.
How high should a sauna ceiling be?
Harvia's manuals give 2100 to 2300 mm, roughly 7 to 7.5 ft, as the usual height. A higher ceiling only stores hot air above the bathers, and the space between the top bench and the ceiling should not exceed 1200 mm (47 in).
How high should sauna benches be?
High enough that the top bench is within 1200 mm (47 in) of the ceiling. In a room with a 7 ft (2130 mm) ceiling that means a top bench at least about 37 in (930 mm) off the floor, reached by a lower bench or step.
Which way should a sauna door open?
Outward, and with no lock. Manufacturers such as Finnleo require an outward-swinging door and allow only a magnetic or spring catch, so anyone who feels unwell can push their way out.
Which side does the foil go on in a sauna?
On the hot room side of the insulation, with the shiny side facing into the sauna and the seams taped with aluminium tape. A small air gap on battens separates the foil from the interior panelling.
Do I need a permit to build a sauna in my backyard?
It depends on your municipality or county. Many places require a building permit above a size threshold, often around 10 m² in Canadian cities or 200 ft² under US residential codes, and wiring, plumbing or a wood stove can trigger permits even for small buildings. Check with your local building department first.
Can I wire a sauna heater myself?
Heater manufacturers require a licensed electrician, and most jurisdictions require an electrical permit and inspection. Sauna heaters draw a lot of current and usually need a dedicated circuit.
Sources
- Harvia, Ventilation in the sauna (support article)
- Harvia support, How do I select the correct heater power
- Harvia, How to design a sauna?
- Finnleo, Euro Outdoor sauna room installation manual (Rev D, 2025)
- City of Ottawa, The homeowner's guide to building an accessory building
- Coconino County, Accessory structures less than 200 sq ft
Written by Leah, who has spent the better part of two decades heating, fixing and occasionally rebuilding a lakeside sauna and the cabin next to it.
Keep reading
Wood-fired sauna
How wood sauna stoves heat the room, stove types, chimney and clearance basics, firewood and CO safety.
Backyard sauna ideas
Placement, paths, porches, cooling spots, privacy and styles for a sauna in the backyard or at the cabin.
Sauna floor
Sauna flooring compared: concrete, tile, stone and duckboards, with drains, waterproofing and insulation.