How to build a log cabin: logs, corners, settling and the build in order
A log cabin is not a frame cabin with round walls. The logs keep shrinking for years after they go up, and almost every log-specific detail, from the corners to the window frames, exists to let them do that safely.
Short answer
To build a log cabin, choose a log system (handcrafted scribe-fit, chinked, milled, or a kit), source logs at least 20 cm (8 in) in diameter with the bark removed, and set a level foundation that keeps the sill log at least 30 cm (12 in) above grade. Stack the walls course by course with interlocking corner notches, and leave a settling space over every door and window, because green logs can lose about 6% of wall height as they dry. Roof, seal the joints, and use adjustable supports anywhere a post or frame wall meets the logs.
What makes log building different
The general job of building a cabin (site, permits, roof, heat, water) is covered in how to build a small cabin. This guide covers only what changes when the walls are made of stacked logs. Three things drive almost every decision:
- Logs shrink across the grain as they dry, so a log wall gets shorter for years. Doors, windows, posts, stairs, frame partitions, plumbing and the chimney all have to tolerate that.
- The wall is the structure, the insulation, the air barrier and the interior finish at once. You can't open it later to add insulation or rerun a wire.
- The weight. Log walls put heavy, concentrated loads on the foundation, and the bottom log sits closest to splash, snow and rot.
Get those right and the rest of a log cabin build is ordinary carpentry.
Handcrafted, milled or kit
Log cabin building plans fall into a few families. InterNACHI's inspector guide splits them into handcrafted and manufactured homes, and the handcrafted group splits again by how the logs meet each other along the wall.
| Handcrafted, scribe-fit | Handcrafted, chinked | Milled (manufactured) | Log cabin kit | |
|---|---|---|---|---|
| Logs | Natural shape, peeled by hand | Natural shape, peeled by hand | Machined to a uniform diameter or square/D profile | Usually milled logs, pre-cut and numbered |
| How courses meet | Each log is scribed and cut along its length to sit on the log below, with a gasket in the groove | Logs fit tightly only at the corners; the gaps between courses are filled with chinking | Interlocking tongue-and-groove or similar profiles top and bottom | Same as milled, with a parts list and assembly drawings |
| Skill and tools | Highest: scribers, chainsaw, axe, lots of lifting and test fitting | Moderate: corner notches are the hard part | Lower: cutting to length, drilling, fastening | Lowest: follow the drawings |
| Moisture at assembly | Often green or partly dry; settling design is essential | Often green or partly dry | Often dried before final shaping | Depends on the supplier; ask for the moisture content in writing |
| Fits a builder who | Has timber, time and wants to learn a craft | Wants the traditional look with less fitting | Wants straight, predictable walls | Wants a defined materials list and a known design |
A log cabin build kit removes most of the design decisions, not the settling questions. Before buying one, ask what moisture content the logs are delivered at, whether the drawings show settling details for openings and posts, and whether they are stamped or otherwise acceptable to your building department. Coconino County in Arizona, for example, wants plans for log homes to list species, grade and moisture content, fastener types and spacing, and the settling provisions for openings, posts, fireplaces, partitions, stairs and plumbing.
Choosing logs and getting them dry
Strength is rarely what limits a wall log. The University of Tennessee Extension bulletin Wood Protection for Log Home Owners notes that with proper design almost any species can work, and that common choices include pines, spruce, oak, cypress and cedar. What matters more is durability and size:
- Only heartwood is naturally decay resistant, and only in some species, such as cedars, cypress, redwood and white oak. Sapwood of every species can rot and attract insects, which is why detailing that keeps logs dry matters more than species.
- The International Log Builders' Association (ILBA) Log Building Standards set a minimum wall log diameter of 20 cm (8 in) and require all bark to be removed.
- Straight logs with little taper and little spiral grain are much easier to stack. The ILBA standards grade spiral grain and limit how far a strongly twisted log may extend past a notch.
Moisture content and drying
Freshly cut wood can hold more than its own dry weight in water. That free water leaves without any shrinkage; shrinking only starts once the wood drops below the fibre saturation point, roughly 25-30% moisture content. From there on, the UT bulletin puts the loss at about 1% of volume for every 3% drop in moisture, and wood shrinks around 5-10% across the grain from green to fully dry.
Both the ILBA and the US building inspectors' guides draw the line at 19%: logs above it count as green and need the full settling allowance; logs at or below it may use a smaller one based on their measured moisture. How long air drying takes depends on log size, climate and finish. An Alaska Science Forum article citing the University of Alaska's extension service gives two to eight years to reach about 12%, and InterNACHI notes green logs can take up to five years to reach equilibrium in a heated house. That is why most log cabins are built with partly dry logs and designed to settle, rather than waiting for fully seasoned ones.
Settling and shrinkage: why it decides every detail
Settling is the loss of wall height as logs shrink in diameter and, to a lesser extent, compress under load. Most of it happens in the first couple of years. The numbers are large:
| Source | Settling figure |
|---|---|
| ILBA Log Building Standards, section 6 | Allow 6% of wall height for green logs (about 3/4 in per foot, 60 mm per metre); dry logs may use less, based on moisture content |
| ICC 400 Standard on the Design and Construction of Log Structures, section 304 | Prescriptive total settling of 6% of the involved height, or a calculated value from moisture content, climate zone and species |
| Alaska Housing Manual (Alaska Housing Finance Corporation) | About 1/2 to 3/4 in per foot, depending on the water content of the wood; leave a 4-6 in settling space over doors and windows |
| Puuinfo (Finnish wood information service), design of log houses | 10-15 mm per metre for Finnish house logs; round logs settle most, laminated logs least |
An 8 ft (2.4 m) wall of green logs can lose close to 6 in (150 mm). A door frame, a stud partition or a steel post does not shrink along its length, so anything rigid that ties the logs to something that doesn't move will either hang the logs up (opening gaps between courses) or get crushed.
Settling allowance calculator
Enter the involved height (the height of log wall beside a door or window, or under a beam on a post) and the settling percentage your plans use. 6% is the prescriptive figure for green logs in both the ILBA standards and ICC 400.
How builders allow for settling
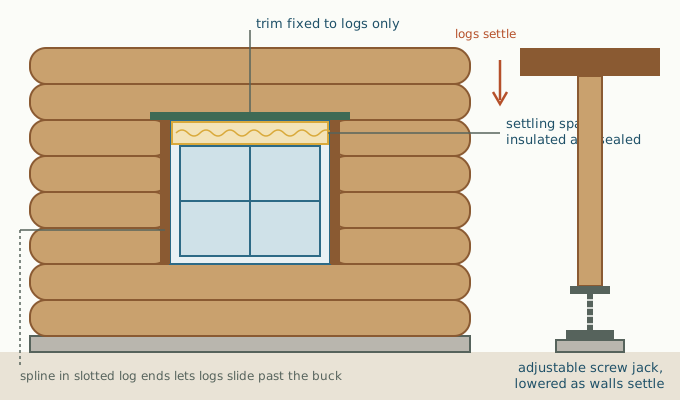
- Settling space over openings. Leave a gap above every door and window frame, sized from the opening height, insulate it with something compressible and seal it so the air barrier survives the movement.
- Bucks and splines (slip joints). The log ends at each opening get a vertical slot; a spline or the frame buck rides in it, holding the wall in line while letting the logs slide down past the frame. ICC 400 calls these sliding joints.
- Trim attached to one side only. The ILBA standards say trim spanning the settling space must be fastened to the log or the frame, not both.
- Adjustable posts. Wherever a post or column carries a beam that also bears on log walls, ICC 400 requires an engineered, adjustable and accessible settling device, usually a screw jack at the base, turned down as the walls settle.
- Roof and partitions. Rafters connect to the log wall with fixings that let it move, and frame partitions are connected to log walls with slotted or sliding details. Plumbing stacks, stairs and the chimney flashing need the same thought.
Corner joints: saddle notch, dovetail, butt-and-pass
| Corner | How it's cut | Typical use | Notes |
|---|---|---|---|
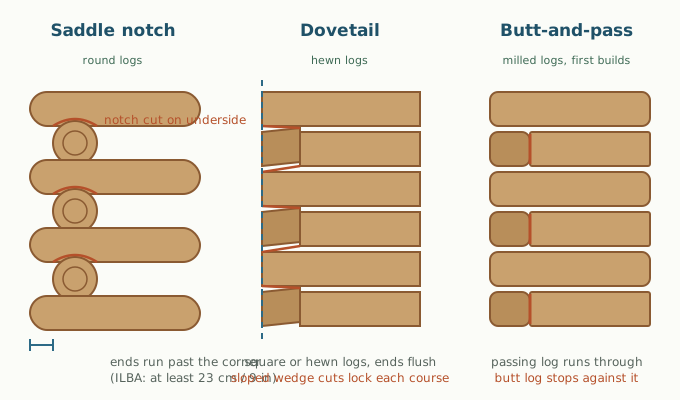
| Saddle notch | A rounded notch on the underside of each log fits over the log below; both logs run past the corner | Round handcrafted logs, scribe-fit or chinked | The ILBA standards want log ends to extend at least 23 cm (9 in) beyond the notch; the notch must leave at least a third of the log |
| Dovetail | Fan-shaped wedge cuts on each log end lock into the perpendicular log; the ends finish flush | Square or hewn logs | No projecting ends to weather; cuts must be accurate on both faces |
| Butt-and-pass | One log stops against the side of the other (often in a shallow mortise); courses alternate | Milled logs and many first builds | Fastest to cut; end grain at the butt soaks up water, so overhang and sealing matter |
If you want to build a log cabin by hand from your own trees, the saddle notch is the traditional choice and teaches the scribing skill you will use on every course. The ILBA also limits how far apart notched corners can be without extra support: 7.3 m (24 ft) for logs under 30 cm (12 in) in diameter.
Sill log and foundation
The foundation for a log cabin has the same job as for any cabin, but with heavier wall loads and less tolerance for rot at the bottom course. Footings, piers or a perimeter wall below frost depth, set level and square, are covered in the cabin foundation guide. The log-specific rules:
- Height. The ILBA standards keep the bottom of the sill log at least 30.5 cm (12 in) above finished grade.
- Bearing. The sill log should be flattened to give at least 10 cm (4 in) of bearing width, per the ILBA.
- Separation and sealing. The UT Extension bulletin recommends a vapour retarder between the foundation and the sill log; ICC 400 also calls for a continuous air seal below the sill or bottom plate log.
- Anchoring. The Alaska Housing Manual says the bottom course must be fastened to the foundation with long anchor bolts, and on posts or piles, through-bolted to beams fixed to them. Each course above is pinned to the one below with pegs, threaded rod, rebar or long spikes.
Chinking vs chinkless walls
Air leaks are the weak point of any log wall, and they get worse as logs shrink and twist. There are two ways to close the joints between courses:
- Chinkless (scribe-fit). The long groove on the underside of each log is cut to follow the log below, with gaskets or foam sealant inside. The ILBA sets the groove at least 6.3 cm (2.5 in) wide and no deeper than a quarter of the log diameter.
- Chinked. Logs touch only at the corners and the gaps are filled. Older homes used mortar; modern chinking is a flexible synthetic that stretches as the logs move, often over a backer rod. Check the chinking maker's moisture limit for the logs before you apply it.
The Alaska Housing Manual is blunt that fibreglass chinking or fibreglass sill seal is not an acceptable air sealing material between logs, and recommends sealing at or near the inside face of the wall (both faces in windy sites) and testing airtightness. In wildfire country, the UT bulletin points out, the joints between logs are the weakest part of the wall for fire, so they need to be filled as well as the logs themselves.
Building code and energy code for log walls
Solid wood is a modest insulator. The Alaska Housing Manual puts logs at about R-1 to R-1.5 per inch depending on species and moisture, so a log wall can't match the prescriptive wall R-values in modern energy codes. That doesn't make log cabins illegal, but it does change the paperwork:
- United States. ICC 400 is the consensus standard for log structures, referenced by the IRC, IBC and IECC. Its section 305 gives log wall U-factors by thickness and species and a way to account for the wall's thermal mass, and section 306 covers air infiltration. Structural logs must be graded and grade-stamped, and the non-log parts (foundation, roof, electrical) follow the regular code.
- Canada. Section 9.36 of the National Building Code (and provincial codes based on it, such as the BC Building Code) has specific provisions for log homes: log wall thermal properties are calculated using ICC 400 section 305, some prescriptive tables don't apply, all joints must be sealed where the logs form the air barrier, and the performance path can be used. Yukon went further and exempts log homes outside Whitehorse from section 9.36, with minimum log sizes of 8 in squared or 10 in round.
In practice this usually means compensating elsewhere: more insulation in the roof and floor, better windows, a tested air barrier. Ask your building department early which compliance route they accept for log walls. Small, unheated cabins may fall under different rules altogether, which the small cabin guide covers.
Building a log cabin from your own trees
Cutting logs from your own woodlot is legal in most places, subject to local tree by-laws. Public land is different. In Ontario, for example, cutting standing trees on Crown land for personal use needs an authorization paid in advance, with a household limit of 20 m³ a year, and personal-use harvesting isn't authorized at all in the Southern Ontario/Great Lakes zone. In BC, timber beyond firewood and Christmas trees goes through the local Natural Resource District office, and on US national forests anything beyond firewood starts with a call to the district office. Check before you fell anything.
Plan for the logistics too: logs at 8 in and up are heavy, long and need peeling, decking off the ground and time to dry under cover. Most people who build a log cabin from scratch with their own timber cut a season or more ahead.
Log cabin build, step by step
- Confirm zoning and permits, and ask the building department what they need for log walls (grade stamps, settling details, energy compliance route).
- Choose the system: scribe-fit, chinked, milled or kit, and the corner style.
- Source logs: species, diameter, straightness, moisture content. Peel and deck them off the ground to dry.
- Build the foundation, level and square, with anchor bolts, keeping the sill at least 12 in above grade.
- Set the sill logs with a vapour retarder and air seal underneath, then the floor system.
- Stack the walls course by course: scribe, cut the groove and notches, test fit, place gaskets, and pin each course.
- Cut door and window openings with slots for splines or bucks, and leave the settling space above each frame.
- Set ridge and purlins or rafters with sliding connections; put adjustable jacks under any posts.
- Close the roof quickly with generous overhangs (the ILBA standards size them with an 8:1 height-to-overhang ratio).
- Seal joints or chink, install windows and doors in their bucks, then wiring, plumbing and stove, all detailed for settling. The stove and chimney follow the same rules as in any cabin; see the wood stove guide.
- For the first few years, adjust the jacks, check the settling gaps and reseal as the logs move.
What drives the cost of a log cabin
How much it costs to build a log cabin depends far more on these choices than on the square footage:
- Log source: your own trees, a local log yard, or a manufactured kit with freight.
- System: handcrafted scribe-fit takes the most labour; milled logs and kits shift the cost into materials.
- Log size and species, which affect handling equipment as well as price.
- Access for a crane or loader to lift logs onto the walls.
- Foundation conditions, and energy code compliance (extra roof and floor insulation, testing).
- Your own time and skill, especially for notching and scribing.
Maintenance: stain, checks and insects
Log walls need more attention than sided walls, mostly to keep water out:
- Finish. Use a finish that lets vapour out while shedding liquid water; InterNACHI warns that a waterproof film can trap moisture and rot logs from inside. The UT bulletin's test: sprinkle water on the wall, and if it stops beading, recoat. Penetrating stains can be recoated; film finishes need scraping first.
- Checks. Cracks along the log are normal. Builders often control where the main check forms with a kerf cut along the top or back of the log. Upward-facing checks on exterior logs trap water and should be filled.
- Insects. Termites are the most serious pest in the UT bulletin; carpenter bees bore 1/2 in holes, and powderpost beetles can reinfest dry logs. Keep firewood and mulch away from the walls.
- Water management. Keep gutters clear, roof overhangs intact and vegetation trimmed back, and fix leaks right away.
If the cabin sits empty in winter, add the walls to the fall checklist in how to winterize a cabin. For a sleeping building smaller than a full cabin, a bunkie built from logs follows the same rules at a smaller scale.
Questions people ask
How much does a log cabin settle?
Green logs (above 19% moisture) are designed for about 6% of wall height, roughly 3/4 inch per foot, under both the ILBA standards and ICC 400. Dried logs settle less, and the allowance can be reduced based on their measured moisture content.
How long do logs need to dry before building?
It depends on log size, climate and finish. Alaska extension figures give two to eight years to reach about 12% moisture, so most log cabins are built with partly dry logs and designed with full settling allowances.
What is the easiest log cabin corner to build?
Butt-and-pass is the simplest to cut, which is why many milled systems and first builds use it. Saddle notches are the traditional choice for round logs and dovetails for square or hewn logs.
What size logs do I need for a log cabin?
The ILBA standards set a minimum wall log diameter of 8 inches (20 cm). Larger logs help with stability and thermal performance; Yukon's code, for example, uses 10 inch round or 8 inch squared logs as its minimum.
Do log cabins meet energy code?
They can, but not through the usual wall R-value tables. In the US, ICC 400 sets the method; in Canada, NBC section 9.36 has log home provisions that reference it. Builders often add insulation in the roof and floor to compensate.
Can I cut trees on Crown land to build a log cabin?
Only with authorization in most provinces. Ontario allows personal-use harvest of standing trees only with a paid authorization and not at all in the southern zone; BC handles it through district offices. Check before you cut.
Is a log cabin kit easier than building from scratch?
A kit reduces design and cutting work, but you still need a proper foundation, settling details, permits and a plan to seal the walls. Ask the supplier for the log moisture content and drawings your building department will accept.
Sources
- International Log Builders' Association, Log Building Standards for Residential, Handcrafted, Interlocking, Scribe-Fit Construction
- International Code Council, ICC 400 Standard on the Design and Construction of Log Structures (2017 public draft)
- University of Tennessee Extension, Wood Protection for Log Home Owners (PB1767)
- Alaska Housing Finance Corporation, Alaska Housing Manual, 4th edition
- BC Building Code 2018, Section 9.36 Energy Efficiency
- Government of Ontario, Using wood from Crown land for personal use
Written by Leah, who has spent the better part of two decades heating, fixing and occasionally rebuilding a lakeside sauna and the cabin next to it.
Keep reading
How to winterize a cabin
Closing a seasonal cabin for winter: water, well, toilets, stove, sauna and power, with a printable checklist.
How often to clean a chimney
Yearly inspection, the 1/8 inch cleaning mark, creosote stages, DIY sweeping, logs and chimney fires.
Wood stove for a small cabin
Sizing a wood stove to a small cabin, certification, clearances, chimney, inspection and firewood.