How to winterize a cabin: closing the cottage for winter, step by step
Closing up for the season comes down to one job done carefully, getting every drop of water out of places where it can freeze, plus a handful of smaller ones. Here is the order I'd do it in, with a checklist you can print and tape inside the door.
Short answer
To winterize a cabin you leave unheated, shut off the water supply, turn off and drain the water heater, open every tap and drain valve until the lines are empty, and pour non-toxic RV (propylene glycol) antifreeze into every sink and shower trap and into each toilet tank and bowl. If you have a well, switch off the pump and drain the pressure tank. Then clear out food, close the stove and chimney, shut off unneeded power, and arrange for someone to check the place over the winter.
Two things "winterizing" can mean
People use the same word for two different projects, and it's worth knowing which one you're searching for.
- Closing a seasonal cabin: you're leaving in the fall and won't be back until spring. Nobody heats the place, so anything that holds water has to be emptied or protected. Most of this guide is about that.
- Making a cabin four-season: you want to use it in January. That means insulation, a reliable heat source and pipes that stay above freezing. When real estate listings say "winterized cottage," this is usually what they mean. There's a short section on it at the end.
A third option sits in between: leaving the heat on low all winter instead of draining. The Red Cross, in a fact sheet on frozen pipes, suggests that if you go away in cold weather you leave the heat on no lower than 55°F (about 13°C). That works in a house with reliable power and someone nearby. At a remote cabin a single power cut or an empty propane tank can undo it, which is why so many owners drain the system instead, or do both.
Step 1: shut off and drain the water
Water left in pipes, pumps, tanks and traps is what causes most of the spring damage. Water expands as it freezes and splits pipes and fittings. The order below follows the well-system winterizing sheet from the Water Systems Council (a US nonprofit for private well owners) and the vacant-home guide from the City of Hopkins, Minnesota, adapted for a typical cabin.
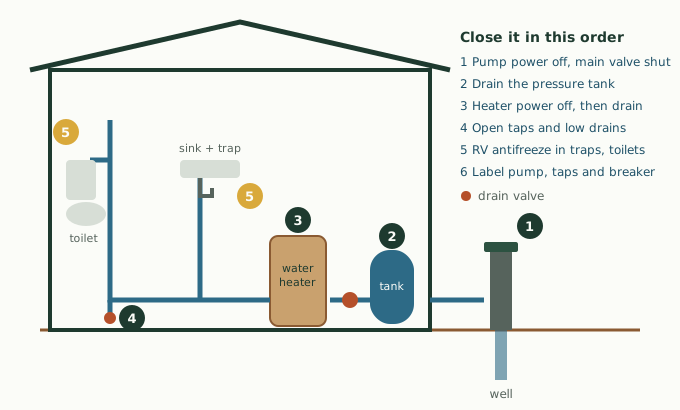
Shut off the supply
- If you pump from a lake or a well, switch the pump off at its breaker. If you're on a municipal or shared system, close the main valve where the line enters the cabin.
- Save a few jugs of water for cleaning up and for mixing, before the taps run dry.
Water heater
Turn the heater off before you drain it. With an electric tank, that means the breaker; GE's water heater instructions warn that the heating elements are damaged if they run without water. With a gas or propane heater, set the control to off and close the gas valve. Then, following your heater's own manual:
- close the cold water inlet to the tank;
- attach a hose to the drain valve at the bottom and run it to a drain or outside;
- open a hot tap somewhere (or lift the relief valve lever) so air can get in, then open the drain valve.
The water coming out can still be hot enough to scald, so give it time or keep hands clear. Leave a note on the breaker or the heater saying it's empty. Refilling the tank before the power goes back on in spring is the step that gets forgotten.
Drain the lines
- Open every tap, hot and cold, including the shower, the outdoor hose bib and any filter housing drains. Work from the top floor down.
- Flush each toilet and hold the handle until the tank is empty.
- Open the lowest drain valve in the system so the pipes empty by gravity.
- If you have a small compressor, blow out each line at low pressure from the open taps. Water lying in a sag or a low elbow will freeze even when the rest of the pipe is empty.
- Drain water softeners, filters and treatment units, and disconnect the washing machine, dishwasher and fridge ice-maker line if you have them.
Toilets and traps
Every P-trap under a sink, tub or shower holds a plug of water on purpose, and so does the toilet bowl. You can't drain those, so you replace the water with antifreeze.
- Use non-toxic RV or plumbing antifreeze (propylene glycol, usually pink). Never use automotive antifreeze (ethylene glycol), which is poisonous, and avoid alcohol-based products. The Water Systems Council notes that propylene glycol is considered safe for wells and septic systems.
- Pour at least a quart (about 1 litre) slowly into each sink, tub and shower drain so it pushes the water out ahead of it.
- For each toilet: sponge out what's left in the bowl, pour at least a gallon (about 4 litres) of antifreeze into the tank, and flush so it fills the bowl and its channels.
- Pour about a quart into any floor drain.
Mix or use the antifreeze according to its label for your winter low. Then put a sign on the taps and toilets saying the plumbing is winterized. In spring, flush the drains with water before using them normally.
Winterizing a cabin with a well
A well adds the pump and the pressure tank. After switching the pump's breaker off and running the taps dry, drain the pressure tank through its drain valve. What happens next depends on the pump:
- A submersible pump deep in a drilled well sits below the frost and is normally left alone once its power is off.
- A shallow-well jet pump in the cabin or a pump house holds water in its casing. Drain it through its plug, following the manufacturer's instructions.
- Label the pump and its breaker so nobody switches it on dry over the winter.
If you aren't sure how your system was plumbed, or the pump house has no drain points, ask a licensed well contractor to show you once. It's a five-minute lesson that saves a pump.
Step 2: power, appliances and fuel
- Turn off the breakers for anything that should not run all winter: water heater, pump, appliances. Leave on only what you need (a monitoring sensor, a sump pump, heat tape, a low-temperature thermostat).
- Empty, clean and prop open the fridge and freezer. A closed fridge left unplugged grows mould by spring.
- Unplug small appliances and electronics.
- Close the propane valve at the tank if nothing needs gas over the winter. Boilers, heat pumps and radiant floors hold water or glycol in their own circuit and should be closed down by a heating technician.
Step 3: food, bedding and mice
Mice are the other spring surprise. Take out all food, including the half bag of rice and the pet food. What stays should be in glass or metal containers with tight lids. Wash and store linens in sealed bins.
The Public Health Agency of Canada advises sealing gaps with wire screening, steel wool, metal flashing or cement, which is a good fall job around pipe and wire entries, the sill and the base of the door. Its hantavirus guidance matters more in spring, when you open up: don't sweep or vacuum droppings, wet them with a solution of 1 part bleach to 9 parts water, let it sit for 10 minutes, then wipe up with gloves on.
Step 4: the wood stove and chimney
- Let the stove go completely cold, then take out the ashes and store them in a metal container with a lid, outside and away from the building.
- Close the damper or the air control so cold air and animals don't come down the flue.
- Book the inspection. The Chimney Safety Institute of America cites NFPA 211: chimneys and vents should be inspected at least once a year, partly because animals build nests in flues that sat unused. Fall, when you can see the season's buildup, or spring, before the first fire, both work. The guide on how often to clean a chimney covers what to look for, and the one on a wood stove for a small cabin covers clearances if you're planning changes.
Step 5: roof, outside and the sauna
- Clean gutters and clear leaves off the roof so meltwater can run off instead of backing up under the shingles.
- Look over the roof, flashing and chimney cap from the ground with binoculars. Small fixes in October are easier than a ceiling stain in April.
- Drain and store hoses. Drain any outdoor shower and its lines.
- Bring in the dock furniture, flip the canoe, and store fuel-powered tools after running them dry or as their manuals say.
- If the cabin sits where snow piles deep, ask a neighbour or a local service to check the roof after big snowfalls.
Closing an outdoor sauna
The sauna gets forgotten because it's out by the water. It has less to drain, but the same rule applies.
- Empty the water bucket and any water container on the stove. Harvia's manual for its wood-burning heaters with a water tank says to empty the container when the stove won't be used for a long time or the water might freeze.
- Clean out the ashes and close the stove's air control, as for the cabin stove.
- Take out mats, towels and anything that holds moisture.
- Leave the vents slightly open so the room can keep drying through the winter. A sealed sauna that went into November damp comes out in May smelling of it. The guide to sauna ventilation explains where the vents are and why they matter.
Step 6: insurance, security and the last walk-through
Read the vacancy or unoccupancy section of your property insurance policy before you leave. Many policies limit or exclude water damage once a property counts as vacant, and some require that someone check the place regularly for the coverage to stay valid. The wording differs between insurers, so ask your broker what yours requires and get it in writing.
Then do a slow last walk-through: windows latched, shutters closed, blinds down, breakers labelled, a copy of this checklist taped inside the door with the date you closed and anything you'd like to fix in spring.
Printable cabin winterizing checklist
| Area | Task | Done |
|---|---|---|
| Water supply | Pump breaker off or main valve shut | ☐ |
| Water heater | Power or gas off, then drained per manual; note left on breaker | ☐ |
| Lines | All taps open, low drain open, lines blown out | ☐ |
| Well | Pressure tank drained; jet pump drained; pump labelled | ☐ |
| Filters and appliances | Softener, filters, washer, dishwasher, ice maker drained or disconnected | ☐ |
| Toilets | Tank and bowl emptied, then RV antifreeze added | ☐ |
| Traps | RV antifreeze in every sink, tub, shower and floor drain | ☐ |
| Power | Unneeded breakers off; small appliances unplugged | ☐ |
| Kitchen | Fridge and freezer empty, clean, doors propped open | ☐ |
| Food and pests | All food out or in sealed containers; gaps sealed | ☐ |
| Stove | Cold, ashes out to a metal can, damper closed, inspection booked | ☐ |
| Fuel | Propane valve closed if not needed | ☐ |
| Roof and outside | Gutters clear, hoses drained, outdoor shower drained | ☐ |
| Sauna | Bucket and water tank empty, ashes out, vents slightly open | ☐ |
| Insurance | Vacancy conditions checked; someone set up to visit | ☐ |
| Signs | "Plumbing winterized" on taps, toilets, pump and heater | ☐ |
In spring, reverse it: close all taps and drains first, refill the water heater before its power goes on, bring the water back slowly, and check each fixture for leaks before moving to the next.
Making a cabin four-season instead
If you'd rather use the place in winter than close it, the work moves from the checklist to the building itself. In rough order:
- Insulate the floor first. Natural Resources Canada's Keeping the Heat In recommends between RSI 4.8 (R-27) and RSI 8.8 (R-50) for floors over unheated spaces, depending on the climate zone, and points out that air leaks around the sill plate and rim joist matter as much as the insulation.
- Close in the crawl space. A cabin on piers with open air under the floor is the hardest kind to keep pipes warm in. Skirting with insulated board, or building an insulated base, keeps the space under the floor milder. The guide to cabin foundation options covers how that ties in with piers and frost.
- Protect pipes that can't be moved inside the heated space. The Red Cross recommends UL-listed heat tape or heat cable on exposed pipes, installed exactly as the maker says, and insulation over it where the product allows. Don't wrap the cable over itself, which makes hot spots.
- Plan a reliable heat source and a backup. If you'll leave it heated while away, a remote temperature alarm is worth more than any other gadget at a winter cabin.
- Check the rules. In Ontario a cottage built for seasonal use may have been approved under a declaration that it won't be occupied continuously in winter (the Town of Gravenhurst form is a typical example), so converting it to year-round use can bring it under the full energy-efficiency requirements. Ask the building department.
A small guest cabin goes through all the same steps on a smaller scale; if you have one, see what a bunkie is for how those are usually built and heated.
Questions people ask
How do you winterize a cabin?
Shut off the water supply, drain the water heater after turning it off, open every tap and the low drain to empty the lines, and put non-toxic RV antifreeze in each trap and toilet. Then switch off a well pump and drain the pressure tank, clear out food, close the stove and chimney, turn off unneeded power, and arrange winter checks.
What antifreeze do you use to winterize cabin plumbing?
Non-toxic propylene glycol antifreeze sold for RVs and plumbing, usually pink. Never use automotive ethylene glycol, which is poisonous, and avoid alcohol-based products.
How do you winterize a cabin toilet?
Shut off the water, flush and hold the handle until the tank is empty, sponge out the bowl, then pour at least a gallon (about 4 litres) of RV antifreeze into the tank and flush so it fills the bowl and its channels.
Do you need to drain the water heater when closing a cottage?
If the cottage won't be heated, yes. Turn off the power or gas first, then drain it following the manual. Refill it completely before turning the power back on in spring, because electric elements are damaged if they run dry.
Can I just leave the heat on instead of draining?
You can, and the Red Cross suggests no lower than 55°F (about 13°C) when you're away. The risk at a remote cabin is a power cut or empty fuel tank with nobody around, so many owners drain the system anyway or add a remote temperature alarm.
What does a winterized cottage mean in a listing?
Usually that the cottage is built for four-season use: insulated, heated, and with water lines protected from freezing. It is different from a seasonal cottage that has simply been closed and drained for winter.
Does a well need winterizing?
The pump and pressure tank do. Switch off the pump's power and drain the pressure tank. A deep submersible pump is usually left alone, while a shallow jet pump needs to be drained according to its manual.
Sources
- Water Systems Council, wellcare: Winterizing and de-winterizing your well system
- City of Hopkins, Minnesota, Winterizing a vacant home
- American Red Cross, Fact sheet: Preventing and thawing frozen pipes
- Public Health Agency of Canada, Prevention of a hantavirus infection
- Chimney Safety Institute of America, FAQ
- Natural Resources Canada, Keeping the Heat In
Written by Leah, who has spent the better part of two decades heating, fixing and occasionally rebuilding a lakeside sauna and the cabin next to it.
Keep reading
How often to clean a chimney
Yearly inspection, the 1/8 inch cleaning mark, creosote stages, DIY sweeping, logs and chimney fires.
Wood stove for a small cabin
Sizing a wood stove to a small cabin, certification, clearances, chimney, inspection and firewood.
What is a bunkie
The cottage sleeping cabin explained: sizes, Ontario permit thresholds, heat, insulation and build steps.